Recently I was looking for a nice “lightbox” type jQuery plugin that will have swipe gestures for mobile devices. I came across Swipebox. I liked this jQuery plugin and decided to make my own WordPress plugin for it. In this article I will outline main steps of its creation. You can find complete plugin at https://github.com/alexrusin/apr-swipebox
Initial Plugin Setup
To start out, I created a plugin folder apr-swipebox with apr-swipebox.php in it. In the beginning of the apr-swipebox.phpI put the following code:
/*
Plugin Name: APR Swipebox
Plugin URI: https://alexrusin.com
Description: A simple plugin that integrates jQuery Swipebox into WordPress.
Version: 0.1
Author: Alex Rusin
Author URI: https://alexrusin.com/swipebox-plugin-for-wordpress/
License: GPL2
Text Domain: apr-swipebox
*/

//Exit if accessed directly
if(!defined('ABSPATH')){
exit;
}

function apr_load_textdomain() {
load_plugin_textdomain( 'apr-swipebox', FALSE, dirname( plugin_basename( __FILE__ ) ) . '/languages' );
}
add_action( 'init', 'apr_load_textdomain' );
The beginning code in comments sets up our plugin. It has all the usual stuff. Also make a not that I am declaring text domain as apr-swipebox for internationalization. The next if statement is a security feature that exists script if file is accessed directly. Finally we load our text-domain.
Enqueuing Swipebox’s Source Code
Now you can download code for jQuery Swipebox plugin from brutaldesign.github.io/swipebox/
Copy and paste src folder from the Swipebox plugin folder into your WordPress Plugin folder (apr-swipebox in my case). Now create a new file called swipebox-control.js in src/js/ folder and put the following code in it:
(function($) {
$(document).ready(function() {
//add swipebox class to image, youtube, and vimeo links
$('a[href*=".png"], a[href*=".gif"], a[href*=".jpg"], a[href*=".JPG"], a[href*="youtube"], a[href*="vimeo"]').addClass('swipebox');

//add swipebox to images with swipebox class
$( '.swipebox' ).swipebox( {
useCSS : true, // false will force the use of jQuery for animations
useSVG : true, // false to force the use of png for buttons
initialIndexOnArray : 0, // which image index to init when a array is passed
hideCloseButtonOnMobile : SWIPE_CONTROLS.hide_close, // true will hide the close button on mobile devices
removeBarsOnMobile : SWIPE_CONTROLS.top_bar, // false will show top bar on mobile devices
hideBarsDelay : SWIPE_CONTROLS.delay_time, // delay before hiding bars on desktop
videoMaxWidth : SWIPE_CONTROLS.video_max_width, // videos max width
beforeOpen: function() {}, // called before opening
afterOpen: null, // called after opening
afterClose: function() {}, // called after closing
loopAtEnd: true // true will return to the first image after the last image is reached
});

});

})(jQuery);
This code adds swipebox class to image, youtube and vimeo links. Then it adds swipebox to swipebox class with the options defined in curly braces. The options that have SWIPE_CONTROLS in them, are the options that we will let a WordPress administrator modify through our plugin. There will be 4 of them. Let’s enqueue javascript and style sheet files for Swipebox in apr-swipebox.php
function apr_swipe_enqueue_scripts(){
wp_enqueue_style( 'apr-swipebox-css', plugins_url( 'src/css/swipebox.min.css', __FILE__ ) );
wp_enqueue_script( 'apr-swipebox', plugin_dir_url( __FILE__ ) . 'src/js/jquery.swipebox.min.js', array('jquery'), '10262016', true );
wp_enqueue_script( 'apr-swipebox-controls', plugin_dir_url( __FILE__ ) . 'src/js/swipebox-controls.js', array('apr-swipebox'), '10262016', true );
}
add_action('wp_enqueue_scripts','apr_swipe_enqueue_scripts' );
At this point functional part of our plugin is done. It works. It just does not have Settings Page UI and is not translated yet.
Creating Settings Page
Let’s now create file settings-page.php in apr-swipebox plugin folder. Place the following code in the beginning of the file.
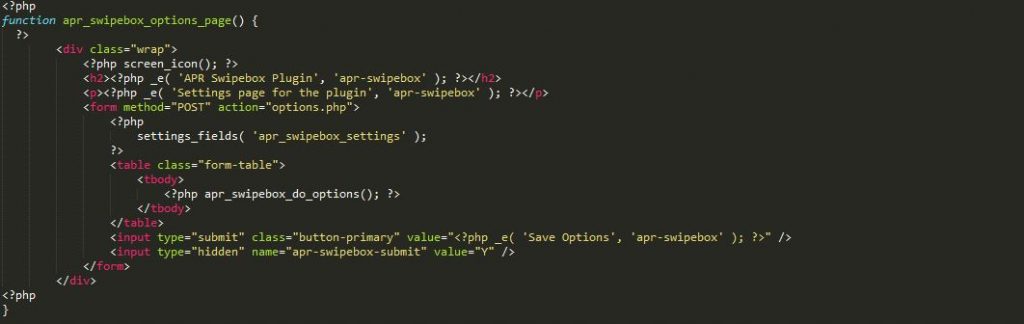
This is a “skeleton” of the settings page. The most important part is to create a form and set its action to options.php that will take care of processing our form data. Another important thing is settings_fields function that outputs our option page fields for the settings page. Its parameter is a settings group name. It will match the group name used in register_setting function later in our code. Next, we create a table where we will put form fields using function arp_swipebox_do_options. Now lets put the next piece of code.
function apr_swipebox_menu() {
	add_submenu_page( 'options-general.php', __( 'APR Swipebox', 'apr-swipebox' ), __( 'APR Swipebox Settings', 'apr-swipebox' ),
		'administrator', 'apr_swipebox', 'apr_swipebox_options_page');
}
add_action( 'admin_menu', 'apr_swipebox_menu' );

function apr_swipebox_init(){
	register_setting( 'apr_swipebox_settings', 'apr_swipebox', 'apr_validate_input');

}
add_action('admin_init', 'apr_swipebox_init');
Here we are doing two things: register plugin’s option pages under Settings menu, using admin_menu action, and register settings when admin_init action fires. Notice that apr_swipebox_settings setting group should match the setting group we used earlier as a parameter in settings_fields function. Function register setting also creates apr_swipebox field in wp_options table in the database where plugin options will be saved. The last parameter in register_setting is custom validate function that we will write later. Now let’s code function apr_swipebox_do_options that will display the plugin’s options form fields.

First of all we grab data from apr_swipebox field we registered earlier in wp_options table using get_options function. If there is data in that field, it will come as an array. If there is no data (when the plugin is just installed), returned value will be an empty string. That is why we check if the data is not an array, then we assign an empty array to the $options variable. Before displaying the data we also check if the corresponding key exist in the array. If not, we assign default values to be displayed. Since data comes from the database as a string, we also use esc_html function. Also make a note of the name attribute format. Name form attribute is used to bind data in PHP. Here we use the name of the field and then in square brackets the actual name we want to bind our input data to.
Finally, let’s take a look at apr_validate_input function that we used as a callback in register_setting.
function apr_validate_input($input){
	ob_start();
	$input['delay_time'] = (int)$input['delay_time'];
	$input['video_max_width'] = (int)$input['video_max_width'];

	$type = 'error';
    $error_message_delay = __( 'Delay before hiding bars should be greater or equal to 0', 'apr-swipebox' );
    $error_message_video = __( 'Video max width should be greater than 0', 'apr-swipebox' );

    $options = get_option('apr_swipebox');
    if (gettype($options)!='array'){
		$options=array(
			'delay_time' => 0,
			'video_max_width' => 1140
			);

	}
	if ($input['delay_time'] < 0){

		add_settings_error(
        'delay_error',
        esc_attr( 'settings_updated' ),
        $error_message_delay,
        $type
    );
		$input['delay_time'] = $options['delay_time'];
	}

	if ($input['video_max_width'] < 0){
		add_settings_error(
        'video_max_width_error',
        esc_attr( 'settings_updated' ),
        $error_message_video,
        $type
    );
		$input['video_max_width'] = $options['video_max_width'];

	}

	return $input;
	ob_end_flush();

}
First of all we will need to start buffering our output, because when we try to assign old values from the database in case a user enters invalid numbers, the headers will be already gone. This function also makes sure the delay time and the video max width are integer numbers. It sets up error messages for add_settings_error. In case a user inputs invalid setting (negative delay time for example) we want to grab previous data from the database and insert it in the fields while also displaying an error. To account for a case when a user enters an invalid setting, but the database does not have date in the apr_swipebox field we use an if statement to assign delay time and video max width default options.
The plugin’s option page is done. Now let’s pass the options data to the plugin’s script. To do so we will use wp_localize_script function. Add the following code inside apr_swipe_enqueue_scripts function after enqueued scripts.
$swipebox_options = get_option('apr_swipebox');
    if (gettype($swipebox_options)!='array'){
        $swipebox_options=array();
    }

        if(isset($swipebox_options) && !empty($swipebox_options)){
            $swipebox_options['delay_time'] = (int)$swipebox_options['delay_time'];
            $swipebox_options['video_max_width'] = (int)$swipebox_options['video_max_width'];
            $swipebox_options['hide_close'] = ($swipebox_options['hide_close'] ==='true') ? true : false;
            $swipebox_options['top_bar'] = ($swipebox_options['top_bar'] ==='true') ? true : false;
        } else {
            $swipebox_options = array(
                'delay_time' => 3000,
                'video_max_width' => 1140,
                'hide_close' => false,
                'top_bar'  => true
             );
        }
  wp_localize_script('apr-swipebox-controls', 'SWIPE_CONTROLS', $swipebox_options);
}
Before passing data to script that controls the plugin, we change the strings that we get from the database to integer and Boolean values. If there is no data, we assign default settings.
Now the last thing to do is to require settings-page.php script and create “Settings” link on the plugin list page. This can be done with the following code.

Internationalization
In order to internationalize our plugin (in our case we decided to translate it in Russian), we need to generate apr-swipebox-ru_Ru.mo file. Please make a note that when internationalizing a plugin, your file should look like mypluginname-ru_Ru.mo, but if I were to internationalize a WordPress theme, I should call my file just ru_Ru.mo. Generating .mo file can be done in several ways. I usually use Poedit program to do it.
Conclusion
This is an example of how to adopt jQuery plugin for WordPress. It can be used to create other plugins such as carousels, accordions, etc. In case of carousel plugin, you also will have to add required html code and get necessary data from the database using custom WordPress query.